


Create an Entry that Says Hello


The first time I walked into, what would eventually be our home, I had a vision for completely face-lifting the front entry. For one, it was dark with super low popcorn ceilings. These ridiculous ceilings were all over our house. They were there for no apparent reason. Our best guess is it was a style? Not sure what style they were going for, but what I do know is it’s not my style! In addition to the suffocating tacky ceiling, the tile on the floor was dirty and dated (and potentially asbestos) and the doors had a medium wood finish. All together, upon entry you were sure you just walked into a 1970’s home. I knew this space could be so different, so here’s what I did!
Your front entry is like making a first impression to a guest in your home. It can set the tone for the rest of your house. I knew I wanted it to be one of the most fun and stylish parts of my home. I also knew that I wanted it to feel more open and bright. And lastly, I knew I wasn’t ditching that beautiful door! So with all of that in mind…

I love to have nice nails and clothes, but I also love to get dirty and challenge myself to learn new skills!
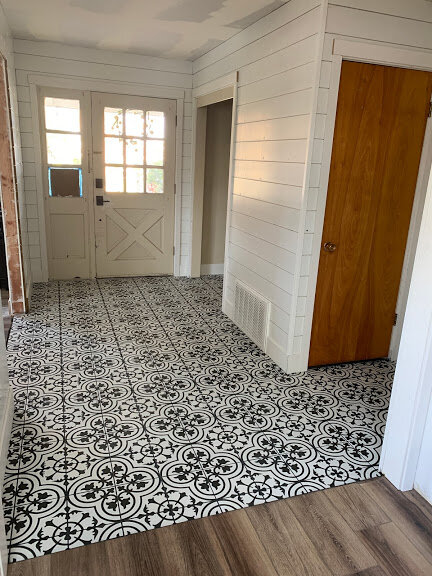
Ryan did the dirty work first! He got rid of the popcorn ceilings and raised the roof…well the ceiling actually. But boy did it make such a huge difference! That extra foot above made the whole space feel way bigger instantly. Next, the walls. I love everything Joanna Gaines, and I knew ship-lap was going to find a place at least once in my farmhouse remodel. This entry is not huge and I wondered if the ship-lap would be too much for it, but I went for it because, remember, I really want to make a statement in this space. I will say, I was surprised with the amount of work installing the ship-lap required. Like, for every board there are at least 4-8 mini holes that you have to fill and paint over…who knew?! But the labor was well worth it!! As soon as I had one wall done, I knew I made the right call. I covered every wall with this recently famous covering and transitioned the room from the 70’s to 2019 instantly.


Next up, flooring. I had been drooling over this pattern forever. It’s all over my Pintrest boards. But when it came to really installing it, I became a little gun shy. I got myself a few samples and placed it over the 70’s asbestos linoleum, and it was a drastic change. Was it too drastic? Too much? I went back and fourth and it was my friend Karen who helped me pull the trigger. She reminded me that I had been wanting to use this tile for a while and also wanted to make a statement in my entry. Thank goodness for friends! Once I committed to the bold tile, I went all the way and decided on dark grout. Choosing a white grout would have completely changed the look of this floor. But let me give you a word of warning about choosing dark grout. IT IS MESSY!!! If you know anything about how grout is installed, just imagine what this looked like! I’m sorry I don’t have a picture of it. But all you have to do is imagine that you made a ton of mud out of coals and water and smeared it all over the floor. I think it took Ryan at least 10 wipe downs and a lot of clean water swap outs in his bucket to get this baby up and running. But I couldn’t be happier with the choice. There is a time an a place for for dark vs light grout, stay tuned for my thoughts on that in an upcoming post!


Better once? Better twice? Can you tell what the main difference is between these two pics? Yep! The doors are painted. The color of the doors was undecided until painting day. It’s hard to tell in this pic, but I painted the front door a deep blue, and salvaged the interior doors (I’m always looking to save money!) and painted them white. We swapped out the hinges for gold ones and got a nice new gold knob. For under $40 we turned a basic dated door current and sassy.
Finishing touches bring a remodel to it’s full glory. Look at what a difference the perfect lighting, a cute sign and the arrangements of the closet space items make!


Along the way, I’ve learned that it’s important to stay open as you work through the remodel process. There are often limitations that you don’t forsee. Instead of getting frustrated by them, see them as an opportunity to do something in the project that you wouldn’t have done other wise. This closet is a perfect example. It originally had wood sliders on it. My original plan was to paint them and leave as is. I was not wanting to spend my money on something new for the doors, and felt like just painting those large flat slap doors was going to be too boring for this new cute entry. It wasn’t until we took the doors off to tile, that I saw it! As soon as the tile went in I thought, “why put the doors back on?!” That little shift allowed me to add this huge element of decor. It’s a super fun place to decorate through the seasons!
Every time I walk in my front door I am greeted by this beautiful entry that says HELLO and welcome home!


